
Why Your Exported Video Looks Blurry, and the Best KineMaster Export Settings
You spent an hour trimming clips, timing text, and tuning color, and then the exported video looks soft, blocky, or smeared. The cause is almost always one of three things: the export settings, the source footage, or the compression a social app applies after you upload. This guide answers the most common questions in order, with the direct answer first and the details after.
Why does my video look blurry when I save it in KineMaster?
A blurry KineMaster export usually comes from one of four causes: the bitrate is too low, the export resolution is higher than your original footage (so it gets stretched), the footage itself is low quality, or you re-exported a file that had already been compressed. Fixing these four settings solves most cases.
Here is what to check, in order:
- Bitrate. The bitrate slider controls how much data is spent on each second of video. A low bitrate means heavy compression, and heavy compression makes every frame lose sharpness, especially fine text and edges.
- Resolution versus source. If your clips are 720p and you export at 1080p or 4K, KineMaster scales them up automatically, and upscaled footage looks soft.
- Frame rate mismatch. Exporting at a different frame rate than your footage can cause judder or a slightly smeared look in motion.
- Double compression. Editing a video that was already saved from a social app, or exporting a project that uses clips you previously exported at low quality, stacks compression on compression.
- Source quality. Low-light, noisy, or heavily compressed footage looks worse after any export because compression struggles with grain.
A quick test: play the exported file from your gallery before uploading anywhere. If it looks sharp there, the blur is happening after upload (covered below). If it already looks soft, the problem is in your export settings or source.
What are the best export settings in KineMaster?
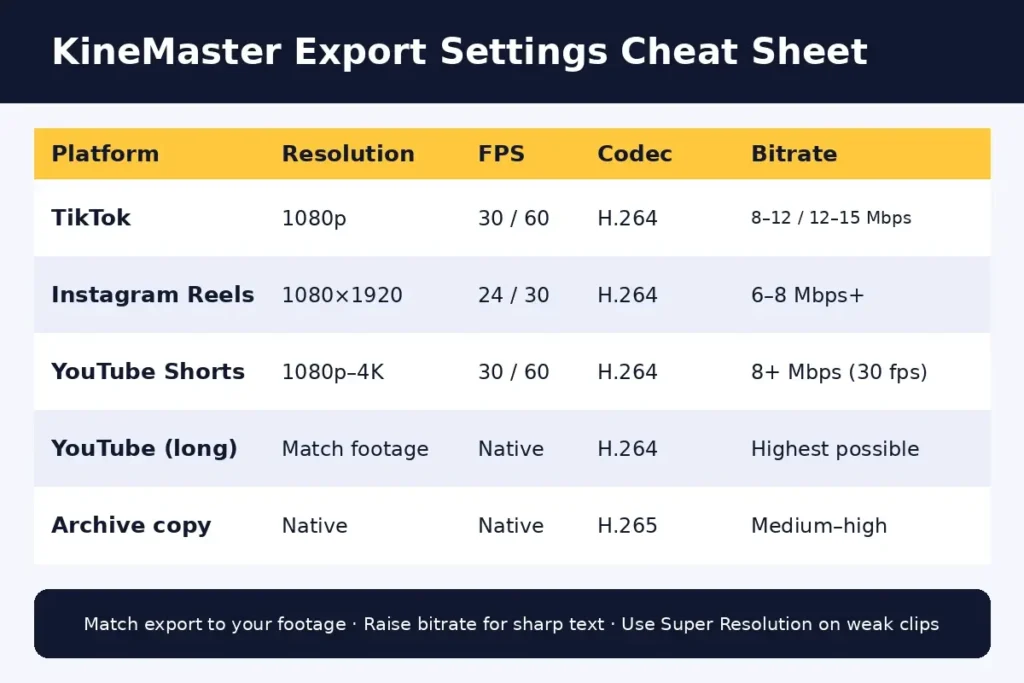
For most social videos, the best KineMaster export settings are 1080p (FHD) resolution, 30 fps (or 60 fps for fast motion), the “Most Compatible” H.264 codec, and a bitrate of roughly 8 to 12 Mbps at 30 fps or 12 to 15 Mbps at 60 fps. Use 4K only if your footage is 4K and the platform supports it.
KineMaster can export up to 4K at 60 fps and lets you choose H.264 or H.265 and set your own bitrate. KineMaster’s own platform guides suggest these starting points:
- TikTok: 1080p, 30 or 60 fps, H.264, about 8 to 12 Mbps at 30 fps and 12 to 15 Mbps at 60 fps.
- Instagram Reels: 1080p, 24 or 30 fps, H.264, about 6 to 8 Mbps (higher is fine, but keep file size manageable).
- YouTube Shorts: 1080p or higher, 30 or 60 fps, H.264, at least 8 Mbps at 30 fps or about 25 Mbps at 60 fps.
A practical default for everything else:
- Resolution: match your footage (1080p for most phone clips).
- Frame rate: match your footage (24, 25, 30, or 60). Do not export at a higher frame rate than you filmed.
- Codec: H.264 for maximum compatibility.
- Bitrate: start in the middle-to-high range and raise it if text or fine detail looks muddy.
- Where to save: internal storage first, which tends to be more reliable than saving straight to an SD card.
To set them: tap the export (share) icon in your project, choose the resolution, frame rate, and bitrate on the export screen, then tap Export. If you cannot see 4K or 60 fps options, check whether your device supports them and whether your project is using the layer mode that limits export settings.
Why does my video look blurry after uploading it to a social app?
Videos look blurry after upload because every social app re-encodes your file to save bandwidth, applying its own compression on top of yours. The result is a lower effective bitrate, softer detail, and sometimes a lower resolution than what you exported.
What is happening behind the scenes:
- Re-compression. Instagram, TikTok, and YouTube Shorts all re-encode uploads. A video exported at a high bitrate can be reduced to a much lower one after upload.
- Resolution caps. TikTok and Instagram Reels play at 1080p at most. If you upload something larger, the app downscales it, often with aggressive compression.
- Upload quality settings. TikTok has a high-quality upload option. If it is off, the app may compress more than necessary. Data saver modes and weak connections can also hurt.
- Viewer conditions. Platforms serve different quality levels depending on the viewer’s connection, so the same video can look sharper on Wi-Fi than on mobile data.
- Re-uploading. Never re-upload a video that was already published, because each re-encode compounds the loss.
How to reduce the damage:
- Export at the platform’s native size (1080p, and 1080×1920 for vertical video).
- Use H.264 and a healthy bitrate so the platform has good data to work with.
- Turn on the high-quality upload setting if the app offers one, and upload on strong Wi-Fi.
- Upload straight from the app rather than through a scheduler where possible.
- Add good lighting when filming. Clean, well-lit footage compresses far better than noisy low-light footage.
- Test with a private post or draft before publishing.
Should I export at a higher resolution than my original footage?
No. Exporting at a higher resolution than your original footage does not add detail. It only stretches the existing pixels, which usually looks softer. For the sharpest result, export at the same resolution (and frame rate) as your lowest-quality clip.
KineMaster automatically scales footage up to match your export resolution, and lower-resolution clips often look blurry when saved at a higher setting. Some practical guidance:
- Mixed footage: if your timeline mixes 4K and 1080p clips, a 1080p export is usually the safest choice, because the lower-quality clips will not be stretched as far.
- Screen recordings and downloaded clips: these are often 720p or lower. Export at their native size, or use Super Resolution first (see below).
- Film high, export right: recording in 4K and exporting at 1080p is a common workflow, because the extra detail in the source gives a cleaner downscaled result.
- Zoom and crop: if you zoom into a clip heavily, you are effectively lowering its resolution, so consider a higher-resolution source for those shots.
What bitrate should I use so my text and details stay sharp?
For sharp text and fine details at 1080p, use about 8 to 12 Mbps at 30 fps, and 12 to 15 Mbps at 60 fps, then raise it if text still looks fuzzy. Text, thin lines, and graphics need more bitrate than a simple talking-head shot because compression struggles with sharp edges.
Why bitrate matters: resolution is the number of pixels in the frame, while bitrate is how much data describes those pixels each second. A 1080p video at too low a bitrate looks blocky despite its resolution. And a 4K video at the same bitrate as a 1080p video has four times as many pixels to describe, so each pixel gets less data.
Tips for crisp text and graphics:
- Use larger, bolder fonts. Thin, small text breaks up first under compression.
- Add contrast. A solid or semi-transparent backing behind text helps edges survive.
- Avoid tiny details near the edges. Platforms crop and overlay buttons there anyway.
- Do not over-compress to hit a file size. If you must reduce size, lower the resolution slightly before dropping the bitrate too far.
- Do not push bitrate to the maximum without reason. At 4K or 60 fps, very high bitrate can overload the encoder and cause export errors on some phones, and the platform will recompress it anyway.
If an export is too large for the platform, a small bitrate reduction is usually better than switching to a lower resolution, but test both and compare
the text.
Should I choose H.264 or H.265 when I export?
Choose H.264 for social media and general sharing, and H.265 (HEVC) only when you want a smaller file at the same quality and you know the device or platform handles it. H.264 plays almost everywhere, while H.265 is more efficient but less universally compatible.
How they compare:
- H.264 (Most Compatible): works on virtually every phone, app, and website. It is the safest upload format for TikTok, Instagram, and YouTube.
- H.265 (HEVC): delivers similar quality at roughly half the data, so a file of a given size looks clearer than the same-size H.264 file. It also supports exports with a transparent background (alpha video).
- Trade-offs of H.265: some older devices and editors cannot play it smoothly, and on complex timelines it can be less stable during export on certain phones. If an export fails, switching codec is a common fix.
A simple rule: upload to social apps with H.264. Use H.265 for archiving, for sharing with people you know can play it, or when storage is tight.
Can the Super Resolution tool improve low quality footage?
Yes, to a degree. KineMaster’s Super Resolution upscales low-resolution clips (by ×2 or ×4) while preserving texture and edges, which helps low-quality footage look cleaner when exported at a higher resolution. However, it cannot create detail that was never in the original.
What to know:
- How it works: it uses AI to upscale each frame, which generally looks cleaner than a simple stretch or a sharpening filter.
- What it cannot do: it is an upscaler, not a detail generator. Very blurry, noisy, or tiny source clips will still look limited.
- How to use it: select the clip on the timeline, tap Super Resolution in the tool panel, choose ×2 or ×4, and let it process. Processing can take a while on long clips or slower devices.
- Cost and setup: KineMaster describes it as free and processed on your device. In some versions you may be prompted to download a plug-in first.
- Best for: older or budget-camera footage, screenshots, and archive clips you want to use in a 1080p or 4K project.
- Formats: it works on video clips on the timeline, with common formats such as MP4 and MOV.
Use it on the weak clips only, not the whole project, and keep your expectations realistic for very poor sources.
Why can a 4K export look worse than a 1080p export after upload?
A 4K export can look worse after upload because most social apps play at 1080p or lower, so they downscale your 4K file with their own compression, and a 4K file at a modest bitrate has less data per pixel than a 1080p file. The extra pixels become extra work for the platform’s encoder, not extra sharpness.
The main reasons:
- Platform limits. TikTok and Instagram Reels do not use 4K, so they downscale it. Their downscaling and re-encoding are often worse than what your editing app would have produced.
- Bitrate per pixel. If you export 4K without raising the bitrate enough, each pixel gets less data, causing more artifacts.
- File size and processing. Larger files hit upload limits, trigger more compression, and take longer to process.
- Device performance. Heavy 4K exports can be unstable on some phones.
There is one notable exception: YouTube. Some creators find that a 4K upload looks better even when viewed at 1080p, because YouTube processes 4K uploads with higher quality settings. That does not carry over to TikTok or Instagram.
So the guideline is: for TikTok, Reels, and Shorts, export at 1080p with a good bitrate. Use 4K when you are uploading to YouTube or delivering to a 4K screen, and when your footage is genuinely 4K.
Quick KineMaster export settings cheat sheet
- TikTok: 1080p, 30 or 60 fps, H.264, 8 to 12 Mbps (30 fps) or 12 to 15 Mbps (60 fps).
- Instagram Reels: 1080p (1080×1920), 24 or 30 fps, H.264, 6 to 8 Mbps or higher.
- YouTube Shorts: 1080p to 4K, 30 or 60 fps, H.264, at least 8 Mbps (30 fps).
- YouTube (long form): match your footage, up to 4K, H.264, highest bitrate your phone handles.
- Archive copy: native resolution and frame rate, H.265 if you want a smaller file.
Troubleshooting checklist for blurry exports
- Play the exported file in your gallery to see whether the blur is already there.
- Match export resolution and frame rate to your lowest-quality clip.
- Raise the bitrate in small steps and compare text sharpness.
- Switch to H.264 if you used H.265 and had playback or upload issues.
- Apply Super Resolution to low-quality clips only.
- Avoid editing files that were already downloaded from social apps.
- Export to internal storage and keep enough free space.
- Turn on high-quality upload in the social app and use strong Wi-Fi.
- Upload a test version privately before publishing.
- Keep an untouched high-quality master of the final export for future uploads.
Related Articles
- How to Make Smooth Slow Motion Videos in KineMaster
- How to Change a Video Background in KineMaster
- KineMaster Audio Problem: How to Fix Sound Issues Easily
- How to Change a Video Background in KineMaster
- How to Add Custom Transitions and Effects in KineMaster
Frequently asked questions
Does a higher bitrate always mean better quality?
No. Quality improves with bitrate up to a point, but beyond it the platform recompresses anyway and the file just gets larger. Aim for the sweet spot for your resolution.
Is 60 fps better than 30 fps?
Only for fast motion or if your footage was filmed at 60 fps. For talking videos and text-heavy edits, 30 fps is fine and uses less bitrate.
Why does my video look sharp in KineMaster but blurry in the gallery?
The editor preview is not the final file. Check the exported file, and raise the bitrate if it looks soft.
Should I export in 4K just in case?
Not for TikTok or Reels. Export at 1080p for those, and keep a 4K master only if your footage is 4K.
Can I fix a video that is already blurry?
You can improve it modestly with Super Resolution, but the best fix is re-exporting from the original project with better settings.
Final thoughts
Sharp exports come from matching settings to your footage and your destination: export at the resolution you filmed, use H.264 for social apps, give the video enough bitrate to protect text, and let Super Resolution rescue only the weak clips. For TikTok, Reels, and Shorts, a clean 1080p export almost always beats an oversized 4K one.